 I can’t believe it’s been so long since my last post. I wish I could tell you that I’ve done something exciting with my time, but it’s honestly nothing I can put my finger on.
I know Fall is almost over, but here are all of the things the OT and I did with our intellectually disabled groups over the past month.
Here we did a sensory acorn craft. I printed an acorn template from Boardmaker in black and white. (Did you know you can use the black and white library only? I didn’t until last year!) We used vanilla pudding for the tops and coffee for the bottoms. Here are all of the materials we used:
We mounted the acorn onto a brown piece of construction paper. We painted glue on the top half first and squirted the vanilla pudding powder (out of the bear/honey container) onto it. This smelled AMAZING!
 |
| This guy loved smelling the pudding! |
Next, we painted glue on the bottoms and put the coffee grounds on it. FYI – I used decaf coffee. I dare not waste my beloved caffeine on artwork! (The art teacher overheard me say this and was slightly offended! haha)
Next we glued symbols for “top” and “bottom” to label our acorns. We also glued symbols for “yellow” and “brown” across from the “top” and “bottom” symbols. We also worked on writing sight words (for those who were capable) “the” and “is” to make a sentence: The top is yellow. The bottom is brown.”
I will have you know that many of my students HATED the coffee smell. One could not stop making the stink face at his project, and when we walked down to his classroom, I caught him hovering his paper over the trash can. Some very much enjoyed it though. I didn’t tell them what either smell was before having them smell it. Watching children smell is possibly one of my favorite things to do. It’s just too adorable and funny. The faces at the coffee smell – man, I wish I could have gotten them all on video!
 |
| The finished project! |
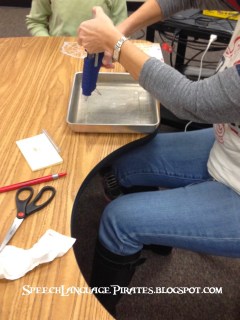
Next, we made hot glue spider webs. This is mainly an adult-only “craft” – but the language is outstanding! We only did this with our higher functioning ASD and language delayed students – not the mod-severe intellectually disabled population. (Basically only with kids who can understand the danger of a hot glue gun – and follow the command “don’t touch” seriously.)
This is a great activity for following directions!
You will need a shallow pan (a dark one or a Teflon-coated one would work well for seeing the web), cold/cool water, a glue gun, PLENTY of glue sticks, and spider rings. We told the students that we needed cold water then had then guess where we might go to get that and how we were going to carry it.
First, we drew circles (about 4) with glue in the water.
Next, draw 4 straight lines through the circles you’ve drawn. This is how the whole thing will stick together, so make sure everything connects.
The last step is to take it out of the water (make sure the glue has completely solidified) and add a spider! We cut the ring part off of the spider rings, then glued in onto the webs. The students told us where they would like to put their spiders. Most chose “in the middle”.
After doing the first student’s web, we had each subsequent student tell us exactly what to do. This worked on sequencing, using specific words, giving instructions, using correct vocabulary, etc.
The kids LOVED their “prize” at the end of this session. This one was a huge hit!
The package of spider rings that we got had orange and black spiders. I’ve seen purple, too. This was a great way to have students make specific requests and use adjective + noun phrases.
For the students who could not do this spider activity, we made an adapted version. We helped the students draw circles and straight lines with glue, then sprinkled silver glitter on it. We stapled the spider to a corner of the paper. These came out very cute, too. The same language concepts were targeted, just in a safer way! (Sorry, no picture. Yet. I’ll take one Monday at school!)


